Introduction
Scissors are indispensable tools found in every home and office, used for a variety of tasks such as cutting paper, fabric, and even packaging. However, with regular use, these tools can become dull and ineffective. Knowing how to sharpen scissors not only enhances their performance but also saves you money by extending their lifespan. This guide will walk you through the process of sharpening scissors effectively, ensuring you achieve clean, precise cuts every time.
Essential Tools and Materials
Before you begin sharpening your scissors, gather the necessary tools and materials. Having everything ready will streamline the process and make it more efficient. Here’s what you’ll need:
- Scissors: The pair you intend to sharpen.
- Screwdriver: To disassemble the scissors.
- Sharpening stone: A quality sharpening stone is crucial for achieving a sharp edge.
- Honing oil or water: For lubricating the sharpening stone.
- Towel: To keep your workspace clean and secure the sharpening stone.
Step 1: Prepare the Sharpening Stone
The first step in the sharpening process is preparing your sharpening stone. This tool is typically available at hardware stores and is essential for sharpening various blades, including scissors. If your scissors are quite dull, you will want to start with the coarse side of the stone and finish with the fine side. For minor dullness, the fine side alone may suffice.
Place the sharpening stone on a towel for stability and apply a few drops of honing oil or water to lubricate the surface. This lubrication helps reduce friction and improves the sharpening process.
Step 2: Disassemble the Scissors
To effectively sharpen each blade, it's best to disassemble the scissors. Use a screwdriver to carefully remove the screw that holds the blades together. This allows you to treat each blade individually, making the sharpening process much more manageable and effective.
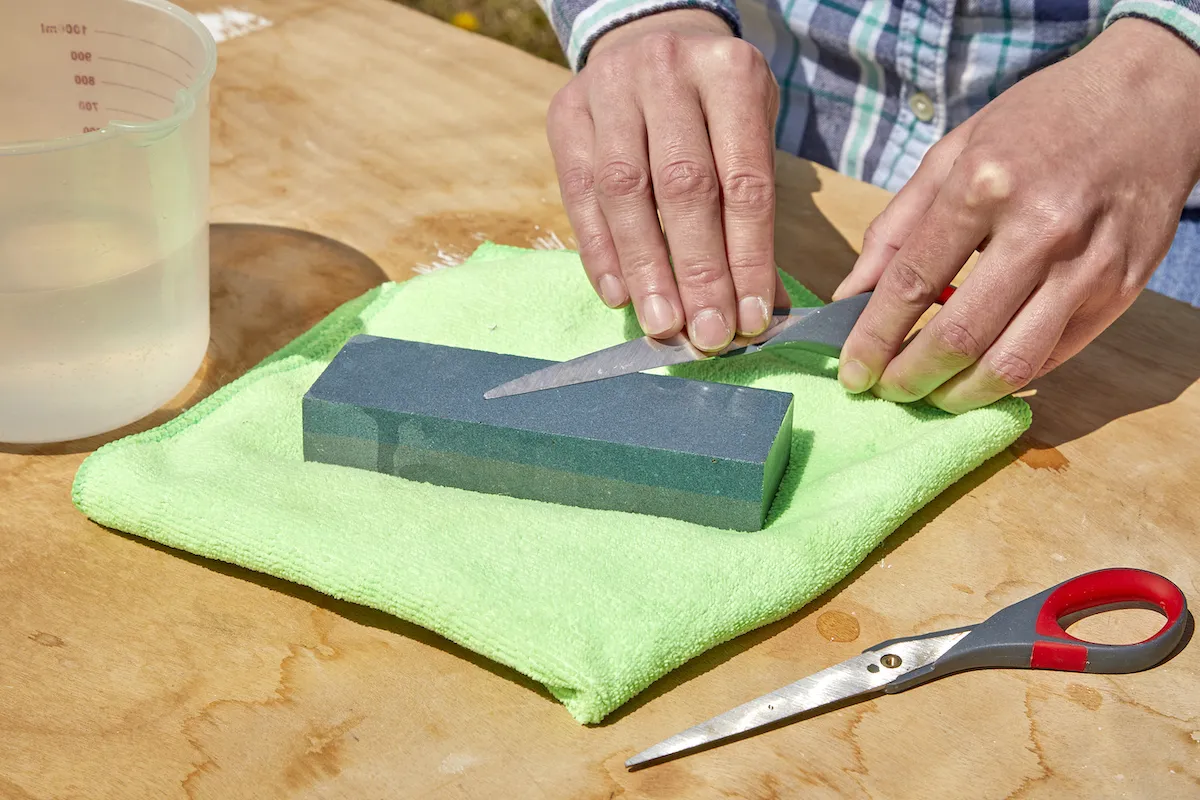
Step 3: Sharpen the First Blade
Begin with one of the blades, placing it on the sharpening stone with the beveled edge facing you. Angle the blade so that the beveled edge lies flat on the stone. Slowly pull the blade towards you, maintaining that angle. The goal is to keep the edge flat against the stone while applying even pressure as you move it across the stone.
If you're starting with a coarse stone, finish the sharpening process by making a few passes on the fine side. A helpful tip is to run a permanent marker along the edge before you start. Once the marker is gone, you will know you have sharpened the entire blade.
Step 4: Sharpen the Other Blade
Repeat the sharpening process for the second blade. Ensure that you use the same technique as before, keeping the beveled edge flat against the sharpening stone. Consistency in technique will ensure that both blades are evenly sharpened, resulting in better cutting performance.
Step 5: Reassemble the Scissors and Remove Burrs
After sharpening both blades, it’s time to reassemble the scissors. Carefully screw the blades back together and open and close the scissors a few times. This action helps to dislodge any burrs that may have formed along the edge during sharpening.
To ensure optimal sharpness, make a few test cuts through a piece of paper or fabric. If the scissors still don’t cut effectively, consider repeating the sharpening process. Regular practice will enhance your skills, and soon you will be sharpening scissors like a pro.
Conclusion
Learning how to sharpen scissors is a valuable skill that can prolong the life of these essential tools and ensure they perform effectively. With just a few simple steps and the right tools, you can maintain sharp scissors for all your cutting needs. Remember to practice regularly, and you’ll find that keeping your scissors sharp is a straightforward task that saves you time and money in the long run.